
I want to start out by thanking everyone for the support and nice comments you all leave for me. I truly appreciate the support of this blog!! I enjoy card making and bringing my creations to you, this wouldn’t be possible without your support, so again, thank you!! *Affiliate links are used at no additional cost to you. When you purchase products through my links I receive a small commission from these sales, which helps me to purchase new products for the cards I share on my blog. Thank you so much for your support, it is greatly appreciated!! Don’t forget to check out my previous blog for MANY more card projects! You can find them HERE.
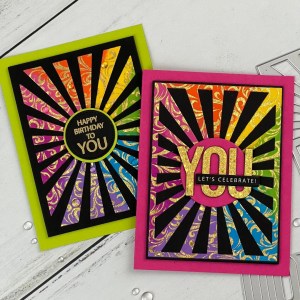
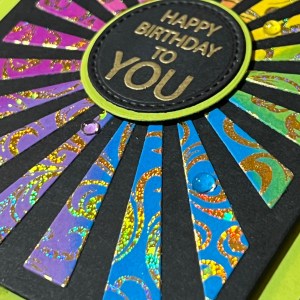
Today I have a fun, “two for one” card project, meaning one colored Poly Glaze panel that I easily turned into two cards! I didn’t have the time, but I could have actually made a THIRD card with the one piece of foiled I used! These Poly Glaze panels are so fun to create with and give stunning foiling results! I use the Gina K Designs Fuse Foil Machine, however, the Minc or other laminators will work. I decided to go with bright, vibrant colors to create two birthday cards to have on hand. I love getting two cards out of one created panel, it saves a lot of time and really stretches the products. All of the inks, cardstock, foil and dies I use are from Gina K Designs. Let’s get started!!
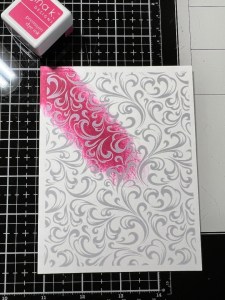
I will be doing all of my work today on my Tim Holtz Glass Media Mat.
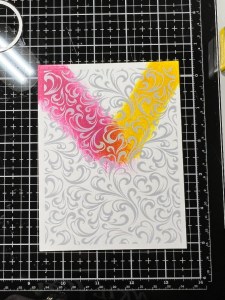
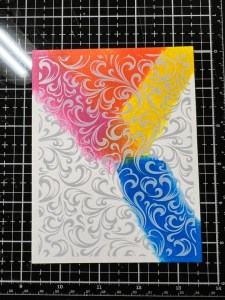
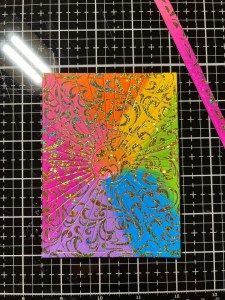
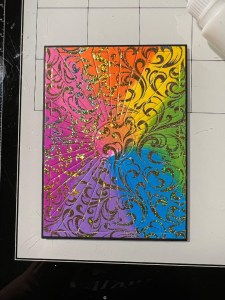
To achieve bold, vibrant colors, I will be using direct to paper with my ink cubes, meaning I will drag the ink cubes directly across my panel. To start, I take a panel of Vintage Flourish Poly Glaze then take my Passionate Pink Ink cube and drag ink from the center to the top left corner of the panel. I then drag Wild Dandelion Ink from the center to the top right of the panel. Next, I drag my Tangerine Twist Ink cube between the two previous colors.

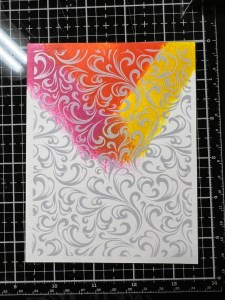
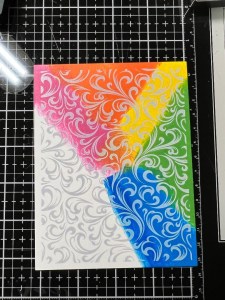
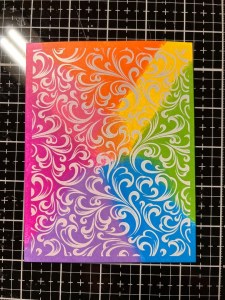
I continue with my Blue Raspberry Ink cube and drag it, this time from the center to the bottom right corner of the panel, followed by my Lucky Clover Ink cube and drag it between the two previous colors. Next, I take my Wild Lilac Ink cube and drag it from the center to the bottom left portion of my panel. Finally, I drag my Medium Orchid Ink between the two previous colors and this completely fills in my panel. Using a soft cloth, I gently buff off the panel to remove any ink that may be sitting on the poly glaze.

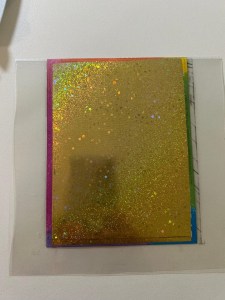
Now it’s time to add some shiny foil to my panel! I start by preheating my Fuse Foil Machine and set it to a 3 heat level. I then place my panel into my Carrier Sheet and place a piece of Glimmering Gold Foil over the top of the panel, pretty side facing up. Once my Fuse is heated up (the light turns green), I run my panel in the carrier sheet through, folded side of the carrier sheet first. After removing the carrier sheet from the machine, I wave it through the air for a few seconds to help cool down the panel. I then remove the panel from the carrier sheet and pull the foil piece away starting at the corner and look at the beautiful foiled design!! ***I save the negative piece of foil to use for a future card one day… this piece can be foiled onto a White Poly Glaze Paper or Black Toner Paper to make another a beautiful panel!

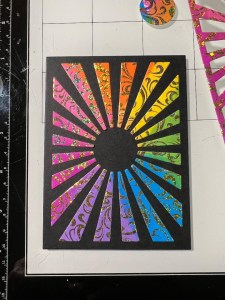
Next, I take my Sunshine Die Plate and place it over my panel then run it through my Platinum 6 Die Cut Machine. Using my Pick & Stick Tool, I poke out the outer frame of the design to release. If any of the ray pieces fall out, I pop them back into the design. To hold all of my pieces in place, I take a piece of Press’N Seal and place it over the front of my die cut piece and press down to adhere.
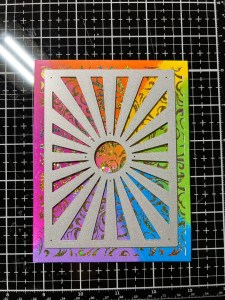
Taking the largest layering rectangle from the Master Layouts 2 Die Set and cut out of Black Cardstock, running them through my P6. I then flip over my foiled panel and add Liquid Glue to only the “ray pieces”, and not any of the frame. Next, I center the panel and place it onto my black panel. I press down then allow the glue to set for about five minutes.


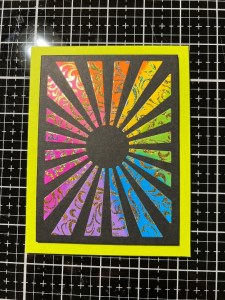
Once the glue has dried, I gently peel back the Press’N Seal. I then pull the frame away and now only the rays are left adhered to the black panel. Such beautiful contrast between the bright colors and foil against the black! To give my panel a little dimension, I add Foam Tape to the back side and add some Liquid Glue which allows me to be able to wiggle the panel into place for even alignment. I then mount my panels onto a Key Lime Cardstock card base.
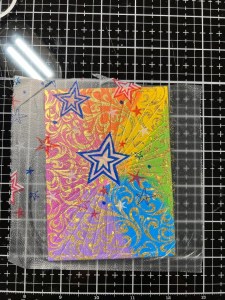
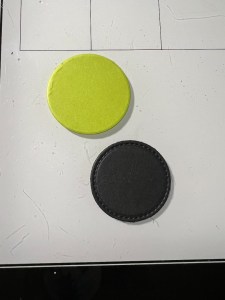
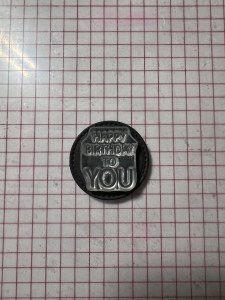
For my sentiment, I take the small stitched and layering circles from the Master Layouts 7 Die Set and cut out of Key Lime Cardstock using the layering die then cut out of Black Cardstock using the stitched die, running them through my P6. I then place the black die cut into my MISTI Stamp Positioner, onto my Grip Mat to hold it into place. Next, I line up an image from the It’s All You Stamp Set then prep the piece using my Anti Static Powder Tool. Using Versamark Ink, I stamp the sentiment onto the die cut then add Gold Embossing Powder and heat set with my Heat Tool.
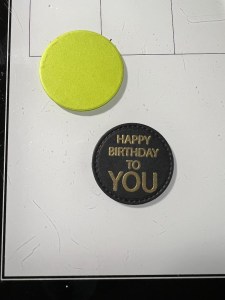
Next, I add Liquid Glue, I adhere the two die cuts together then add Foam Squares to the back and mount onto my card front.


Using my Pick & Stick Tool, I add some Dew Drops using Liquid Glue and this completes my first card.

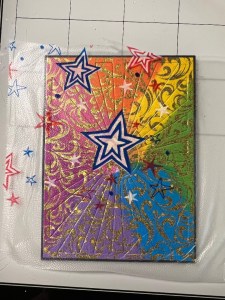
For my second card, I use the largest layering rectangle die from the Master Layouts 2 Die Set, and cut out of Black Cardstock. I then use Liquid Glue to adhere my foiled frame onto the black panel. I again add Foam Tape to the back of the panel for some dimension then adhere it to a Passionate Pink Cardstock card base. I then take the smaller layering circle from the Master Layouts 3 Die Set and cut out of Passionate Pink Cardstock three times. I stack and glue them together then mount them over the center of my card front. For my greeting, I add Glimmering Gold Foil to a piece of Black Toner Paper and run them through my Fuse. I remove the foil sheet, leaving a beautiful foiled piece, then take the You Caps Die Set and cut out of this piece, running them through my P6. For added stability and dimension, I take the same die cut and cut out of Black Cardstock three times then stack and glue them together using Liquid Glue then glue my foiled letters on top of the stack and adhere them over the center of the circle die cut on my card front. For a sentiment, I take my Sentiment Strips Die and cut out a sentiment from the Birthday Babble Sentiment Sheets then adhere it across the foiled letters using Liquid Glue and this completes my second and final card.


I hope you enjoyed today’s cards and learned how easy it is to get two cards from one piece of Poly Glaze! Remember, that leftover negative piece of foil can be added onto White Poly Glaze or Black Toner Sheet to get at least TWO more cards! I love products that allow you to get extra use out of them. Cover plates are great for this as you can use both the positive and negative pieces to create multiple cards. I forget how fun and easy it is to foil with Poly Glaze and Gina has added even more new designs to her collection… don’t forget to check them out HERE! Also! The Fuse is now in stock at Gina K Designs and other retailers, in the white/teal version and also available in the international versions as well! The photos do not come close to showing the sparkle and shine these foiled panels give… so cool!!
If this is your first time visiting my blog, welcome and I hope you return. If you are a returning visitor, thank you so much for your support!
If you would like to be notified by email each time I post a new project, there is an option to add your email (located at the top menu, or on the right side of my page) then hit the subscribe button. Should you have any questions or comments please leave them in the comments section. I’d love to hear from you and what you thought about today’s card.
Thank you for visiting and I hope you come back soon!
Happy Stamping and God Bless!!
Jeannie
