
Hello, welcome to my blog!!
I want to start out by thanking everyone for the support and nice comments you all leave for me. I truly appreciate the support of this blog!! I enjoy card making and bringing my creations to you, this wouldn’t be possible without your support, so again, thank you!! *Affiliate links are used at no additional cost to you. When you purchase products through my links I receive a small commission from these sales, which helps me to purchase new products for the cards I share on my blog. Thank you so much for your support, it is greatly appreciated!! Don’t forget to check out my previous blog for many more card projects! You can find them HERE.
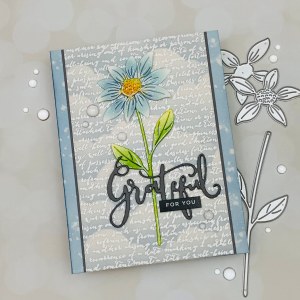
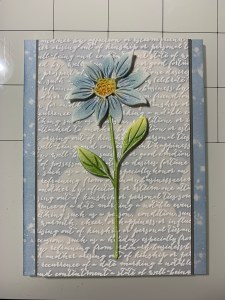
Today I have a card project featuring the new Etched Layered Daisy Stem die from Simon Says Stamp’s Stamptember release! This is a three piece die set that includes the stem and two layering pieces for the head of the flower. These dies have such beautiful etched details!! I wanted to create a soft subtle background for my focal image so I created a cloud background using a stencil with a text embossed vellum overlay. I used regular Distress Ink for my ink blending both on the background and onto the die cut itself to create some soft blending. Let’s get started!!
I will be doing all of my work today on my Tim Holtz Glass Media Mat.
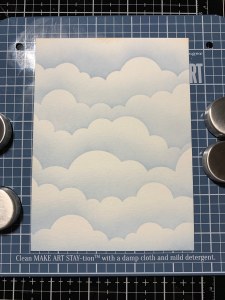
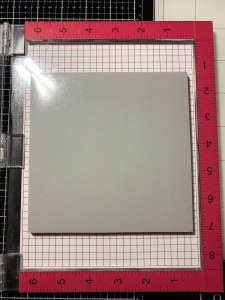
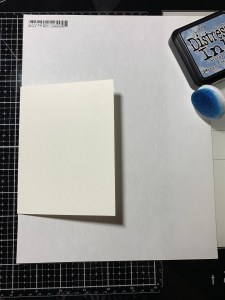
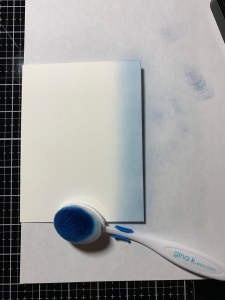
I start by cutting a 4 1/4″ x 5 1/2″ panel out of Watercolor Cardstock using my Guillotine Paper Trimmer. I then place the panel onto my Art Stay-tion Magnetic Surface and lay over the top my Cloudy Stencil and hold it down with the magnets. If you have never used the Art Stay-tion before, it is a great tool to hold down stencils when ink blending as the magnets are strong and can be moved around as you ink blend. I use the smaller 7 x 7 size, it is also available in a 12 x12 size. I start by using my Blending Brush to blend Stormy Sky Distress Ink over the edge of the stencil, fading the ink towards to top of the panel. I then remove the magnets and turn the stencil to a different cloud formation, sliding the stencil down a bit then place the magnets back over the stencil to hold it down. Again I blend Stormy Sky Distress Ink over the edge of the stencil and fade the ink out as I blend up towards my previous blend. I repeat this process until my panel is complete.


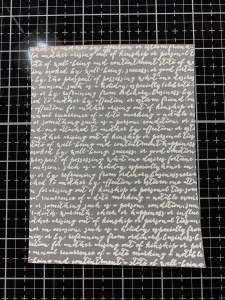
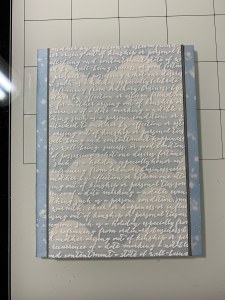
Next, I want to create an overlay piece to soften my blended background. I place my Script Bold Prints Background Stamp into my MISTI Stamp Positioner making note of it’s position which is at the 1 1/4″ mark. I then pick up the stamp with the door of my MISTI and place a 4 1/4″ x 5 1/2″ piece of Vellum into my MISTI at the same measurement and prep it using my Anti Static Powder Tool. Next, I ink up the stamp with Versamark Ink and stamp it onto the piece of Vellum. The Vellum will stick to my stamp after stamping so I use my Reverse Tweezers to pull it from the stamp. I then add White Embossing Powder and heat set it with my Heat Tool.

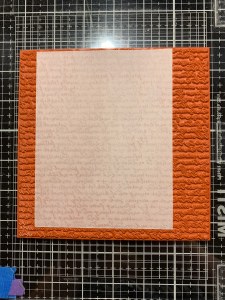
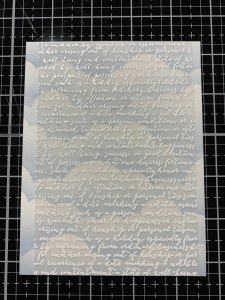
To adhere my Vellum onto the background I cut a 3 1/2″ x 5 1/2″ piece of Double Sided Adhesive Sheet, remove one side of the release paper and adhere it to the back of my embossed Vellum then trim down the sides. I then remove the other release paper and adhere it onto my cloud blended background and trim off the edges with my Guillotine Paper Trimmer. My panel now measures 3 1/2″ x 5 1/2″.


To add some separation to my panel, I cut a 3 5/8″ x 5 1/2″ panel out of Stormy Sky Cardstock using my Guillotine Paper Trimmer. *Though the distress ink and this cardstock have the same name, they are not the same colors 🙂 Using Double Sided Tape I adhere the two panels together so that there is a thin gray edge showing on either side.

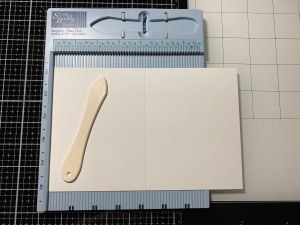
Next, to create a card base I place a 5 1/2″ x 8 1/2″ piece of Watercolor Cardstock into my Scor Buddy and score it at 4 1/4″ creating a side folding card base. I want to add some color to the edges that will be showing when my panel is mounting. To protect the back of my card base, I place a piece of plain copy paper into the card so that no ink gets onto the back when I blend my ink. Using my Blending Brush I blend Stormy Sky Distress Ink over the outside and folded edges of the card base that will be showing once my panel is mounted.

To soften the ink and add some interest I use a paintbrush and splatter clean water droplets over the inked areas then lay a paper towel over the panel to pick up the water. I then add Double Sided Tape to the back of the panel and adhere it onto the card base.


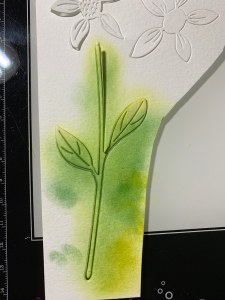
I now take my Etched Layered Daisy Stem Die and cut out of Watercolor Cardstock, running them through my Big Shot Die Cut Machine. To make my ink blending easier I place the pieces back into the negative piece they were cut from. Using my Mini Blending Brushes, I blend Crushed Olive Distress Ink over the stem die cut. I then blend Rustic Wilderness Distress Ink over the base of the leaves and a bit onto the stem.


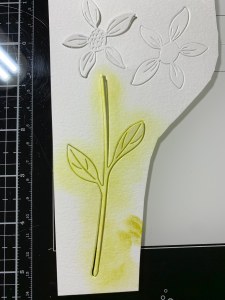
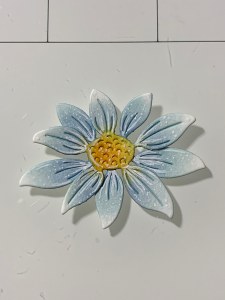
Next, I take my Mini Blending Brush and add Speckled Egg Distress Ink onto to the flower petals leaving the tips white. To add some depth I blend Stormy Sky Distress Ink to the base of each of the petals. For the center of the flower I first blend Mustard Seed Distress Ink over the entire center then blend Wild Honey Distress Ink to the bottom portion for a little contrast.


Now that my die cut pieces are all colored I use Liquid Glue to adhere the top flower die cut to the bottom layer. To add some subtle detail to the die cuts I drew some lines and dots onto the flower and stem using my White Gel Pen.


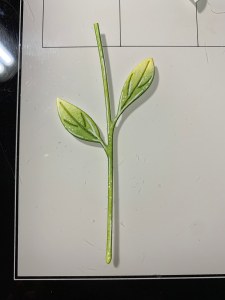
To mount the die cut pieces onto my card front, I start by adding Liquid Glue to the stem and add Foam Squares to the back of the two leaves then adhere the piece onto the front of my card. *I did trim off the top of the stem just a bit. To give the daisy die cut some added dimension, I added Foam Squares to the back of the petals of the top layer die cut then added Liquid Glue to the back of the bottom layer petals. I then mounted the die cut onto my card front over the stem.
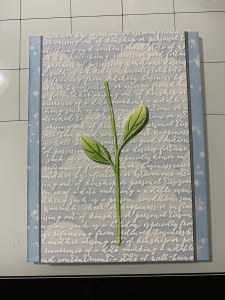
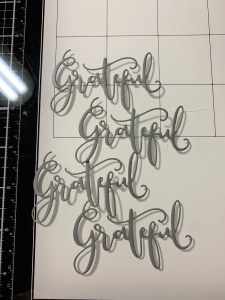
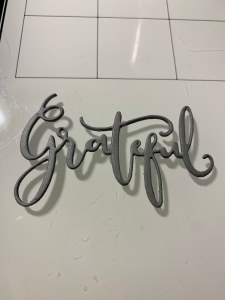
For my greeting, I took a die from the Fluttering Fall Layering Stencils Bundle and cut out of Stormy Sky Cardstock four times, running them through my Big Shot. Using Liquid Glue I stack and glue the die cuts together then mount the greeting onto my card front across the stem of the flower. Next, I choose a sentiment from the Sentiment Strips Reverse Gratitude and trim it down using my Guillotine Paper Trimmer then add Liquid Glue to the back of it and adhere it across my greeting die cut.
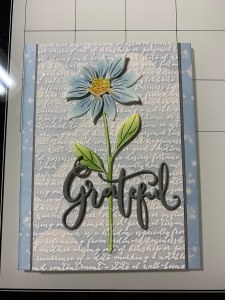
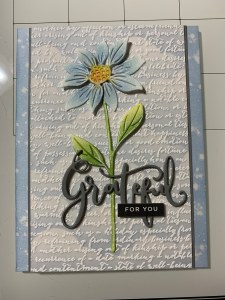
Using my Jewel Picker I add Clear Round Drops with Liquid Glue and this completes my card.
I hope you enjoyed today’s card! I am really loving these new die cuts from Simon Says Stamp’s recent release, I think they would also look great cut out of an alcohol inked background…hmmm? I started out thinking I would do some watercoloring on these die cuts that’s why I chose to use watercolor cardstock. I ended up deciding to ink blend the images instead. I love ink blending on watercolor cardstock as it gives a different kind of blend, the inks actually blend very well! The design of this card would be perfect for a baby shower by adding a simple stacked “congratulations” die cut over the clouds background in place of the flower. Adhering vellum can sometimes be tricky as most adhesives show through on vellum. Strategically placing adhesive behind die cuts works great, but in this case I wanted the entire panel adhered down and these adhesive sheets ended up working perfectly! They also work great with delicate or intricate dies, just add adhesive to the back of the panel you are die cutting from then run through your die cut machine as you normally would. Peel off the release paper and your die cut is ready to be mounted! I will be out the rest of the week as we have guests coming to visit. I hope everyone has a wonderful weekend and I will be back next week with another card project!
If this is your first time visiting my blog, welcome and I hope you return. If you are a returning visitor, thank you so much for your support!
If you would like to be notified by email each time I post a new project, there is an option to add your email (located on the right side of my page) then hit the subscribe button. Should you have any questions or comments please leave them in the comments section. I’d love to hear from you and what you thought about today’s card.
Thank you for visiting and I hope you come back soon!
Happy Stamping and God Bless!!
Jeannie

Love the subtle colors and the subtle look design!
LikeLiked by 1 person
Thank you so much Marie!!
LikeLiked by 1 person
Beautiful card! Thank you so much for sharing your creative process and the wonderful photos! I’ve pinned this to try myself!
LikeLike
Thank you so much Cheryl!! Have fun crafting!!
LikeLike