
Hello, welcome to my blog!!
I want to start out by thanking everyone for the support and nice comments you all leave for me. I truly appreciate the support of this blog!! I enjoy card making and bringing my creations to you, this wouldn’t be possible without your support, so again, thank you!! *Affiliate links are used at no additional cost to you. When you purchase products through my links I receive a small commission from these sales, which helps me to purchase new products for the cards I share on my blog. Thank you so much for your support, it is greatly appreciated!! Don’t forget to check out my previous blog for many more card projects! You can find them HERE.
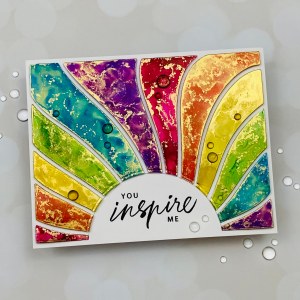
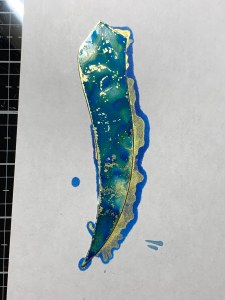
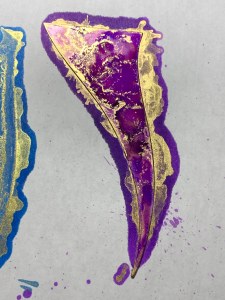
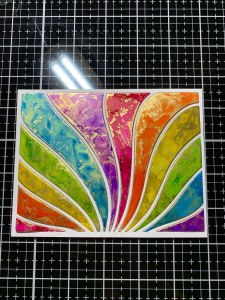
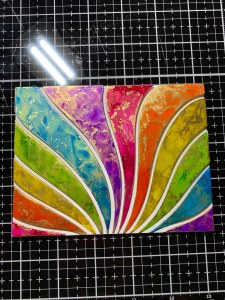
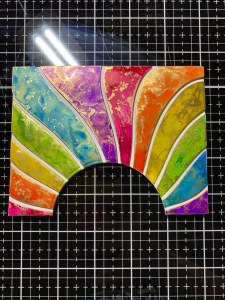
Today I have a bright vibrant card that uses alcohol inks to boldly color individual sections from the Sun Flare Window Die. When I first seen this die I knew I wanted to color these sections with alcohol inks! For some added texture and contrast I also used an alcohol alloy mixed in with each color. I absolutely love the way these alloys break apart and mix in with the inks, creating somewhat of a marbled look! I kept today’s card very simple with the die and alcohol inks being the focus. I spent a lot of time trying different die cut greetings and shapes to layer over the panel but nothing seemed to look right. In the end I decided to go simple by die cutting a window to place a simple sentiment and felt that it was the perfect touch! I will be using alcohol inks, die cuts and a stamp to create today’s card… that’s it! Let’s get started!!
I will be doing all of my work today on my Tim Holtz Glass Media Mat.
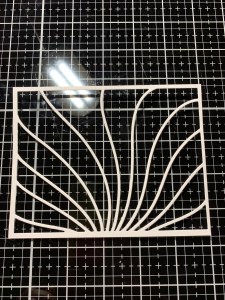
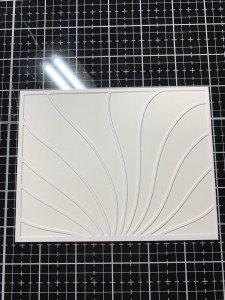
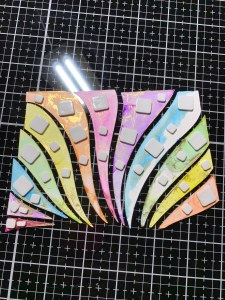
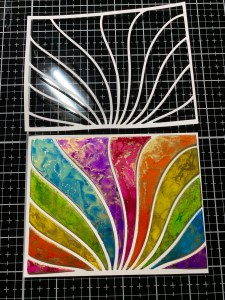
To start, I take my Sun Flare Window Die and cut out of a piece of Yupo Paper, running them through my Big Shot Die Cut Machine. I then pop out each piece and lay them out order.
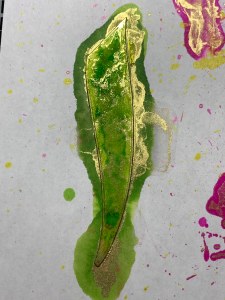
To help contain the ink overflow I work over a sheet of plain copy paper that will soak up some of the ink as I blend and allows my work area to stay somewhat clean as I switch colors. Starting with the smallest die cut piece on the left I add a drop of Fiesta Alcohol Ink to the bottom of the piece followed by a drop of Gilded Alcohol Alloy and a small amount of Blending Solution (Adding the blending solution directly over the alloy helps to break it apart and move it around easily). I then take my Air Blower to gently move the ink towards the top while pushing the alloy around until I am satisfied with the look then set the piece aside to dry.

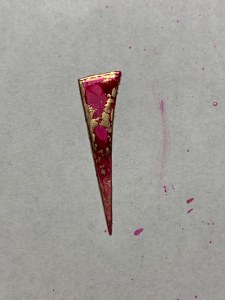
I take the next size die cut piece and place it over a clean area of the copy paper to work on so the pieces do not get contaminated with the previous colors. I then add Valencia Alcohol Ink and the Gilded Alcohol Alloy followed by a drop of Blending Solution and push the color around with my Air Blower until I am happy with the look then set the piece aside to dry.
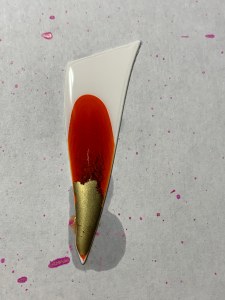
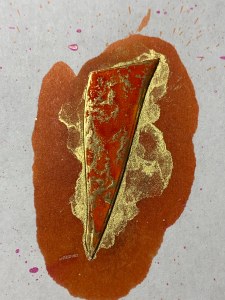
I repeat the same process for the remaining pieces using Dandelion Alcohol Ink, Limeade Alcohol Ink, Glacier Alcohol Ink and Purple Twilight Alcohol Ink and also add a drop of Gilded Alcohol Alloy and Blending Solution to each color then blend with my Air Blower. I repeat all of the colors until each piece is colored then set them aside to dry while I clean up my work surface.

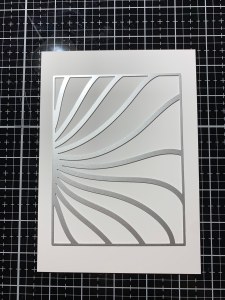
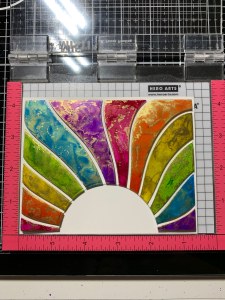
To create a guide for my pieces I use the same Sun Flare Window Die and cut out of a piece of cardstock, running them through my Big Shot. I then lightly spray some Pixie Spray onto the back of the die cut piece to temporarily adhere it down to a 4 1/4″ x 5 1/2″ panel of White Cardstock.
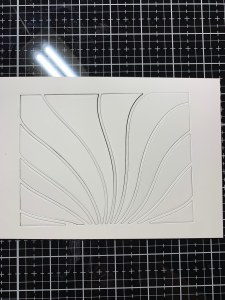
To add dimension to each of the die cut pieces I add small and large Foam Squares to the backs. I then remove the release papers and begin mounting them into the temporary frame. I do add Liquid Glue to the end of the thin tips of each strip when mounting to adhere them down at the bottom of the panel.
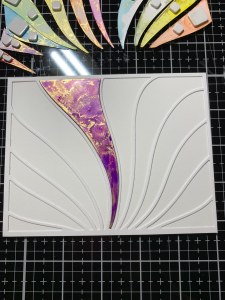
After all of the strips are mounted, I carefully remove the temporary frame and now all of my pieces are evenly spaced and mounted into place on the panel. Using my Guillotine Paper Trimmer I cut off all four edges of the panel right up to the inked pieces.
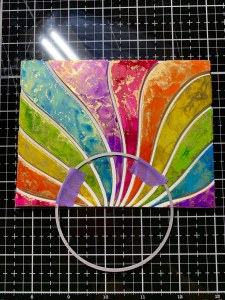
Now I need to cut an area out for my sentiment to show through. I take a circle from my Infinity Circle Dies and adhere it down over the lower section of my panel and run them through my Big Shot.
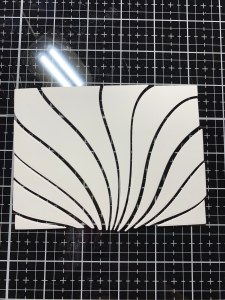
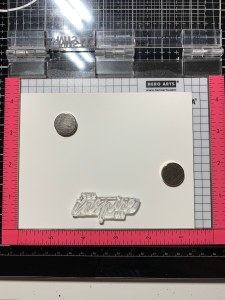
Now it’s time to stamp my sentiment. I place a 4 1/4″ x 5 1/2″ panel of White Cardstock into my MISTI Stamp Positioner then center my inked panel over it to determine my stamp placement. I then chose a sentiment from the Sketched Flowers Stamp Set. Once I have my stamp centered in the cut out opening I remove the panel then stamp my sentiment using Versafine Clair Nocturn Ink.
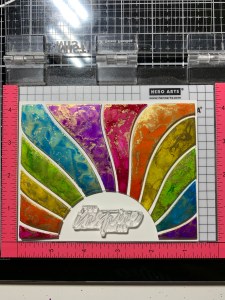
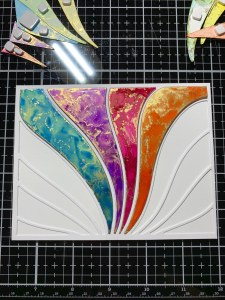
To adhere my panel I add Double Sided Tape to the back of it then center and adhere it to the stamped panel. I then mount my panel onto a 5 1/2″ x 8 1/2″ (scored at 4 1/4″) white card base also using Double Sided Tape.

Using my Jewel Picker I add some Clear Round Drops with Liquid Glue and this completes my card.
I love the design of this die and think it would be great for just about any occasion by changing the sentiment. Choosing different shades of the same color would also be a great look! I will be off the rest of the week as I have some family things and will be working on a card project for Gina K. Designs new release on Monday night!! I hope everyone has a wonderful rest of the week and I will see you on Monday night!
If this is your first time visiting my blog, welcome and I hope you return. If you are a returning visitor, thank you so much for your support!
If you would like to be notified by email each time I post a new project, there is an option to add your email (located on the right side of my page) then hit the subscribe button. Should you have any questions or comments please leave them in the comments section. I’d love to hear from you and what you thought about today’s card.
Thank you for visiting and I hope you come back soon!
Happy Stamping and God Bless!!
Jeannie

Love this card! The colors are amazing! TFS
LikeLike
Thank you so much Barb!!
LikeLike
This card is stunning! I love this die too. I’m really enjoying your
blog. Its so helpful to see step by step pictures as well as explaining
what you do. I can tell you put a lot of love & time & effort
into your blog. Just wanted to tell you “Thank You” & that
you’re doing a wonderful job!! Have a blessed day 😊
LikeLike
Aww, thank you so much Tina for your sweet words!! I’m happy that you are enjoying my blog and find it helpful. I love to share my projects with everyone! 🙂
LikeLike
So pretty! That gilded alloy is just gorgeous!
LikeLike
Thank you so much Megan!! Those alloys are amazing!!
LikeLike