
Hello, welcome to my blog!!
I want to start out by thanking everyone for the support and nice comments you all leave for me. I truly appreciate the support of this blog!! I enjoy card making and bringing my creations to you, this wouldn’t be possible without your support, so again, thank you!! *Affiliate links are used at no additional cost to you. When you purchase products through my links I receive a small commission from these sales, which helps me to purchase new products for the cards I share on my blog. Thank you so much for your support, it is greatly appreciated!! Don’t forget to check out my previous blog for many more card projects! You can find them HERE.
For anyone that missed out on the Gina K. Designs and ThermoWeb collaboration set, Gnome For The Holidays Kit they are now back in stock while supplies last!! Also still available is the Festive Fall Gnome Bundle add on, both sets are sold only through ThermoWeb. I have a store banner located on the right side of my blog that takes you directly to their website or you can find them HERE.
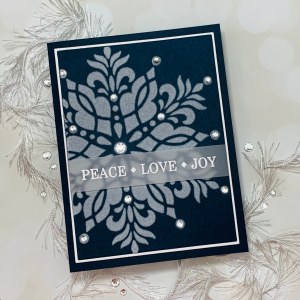
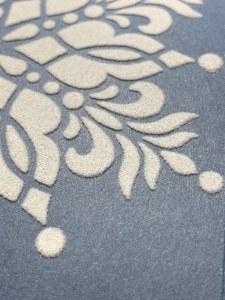
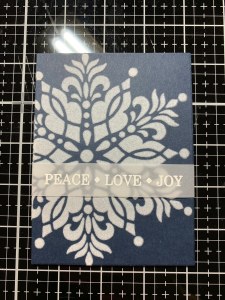
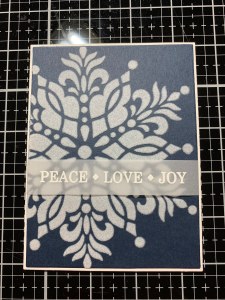
Today I have a super simple card using the Stellar Snowflake stencil from Gina K. Designs. This is a big, bold snowflake that is just gorgeous ink blended, embossed or applied with any paste products. However, today I’m going to be using the Transfer Gel Duo and a laminator to add flocking to my stenciled image, so fun!! Transfer Gel Duo allows you to add foil or flock to your stenciled images using a heated laminator or pressure from your die cutting machine. It’s hard to capture in the photos but the flock gives a soft, fuzzy texture to the image and adds a unique look to the card. All of the products I use on today’s card are from Gina K. Designs, with the exception of the flock which is from ThermoWeb. Let’s get started!!
I will be doing all of my work today on my Tim Holtz Glass Media Mat.
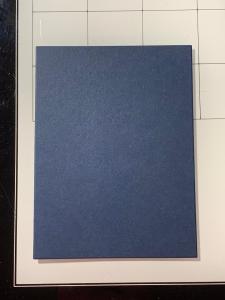
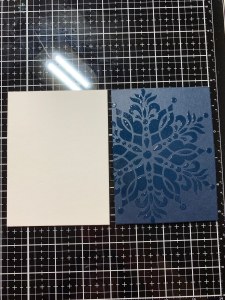
To start I take the second largest die from the Master Layouts 1 Die Set and cut out of In The Navy Cardstock, running them through my Big Shot Die Cut Machine. I then take my Stellar Snowflake Stencil and adhere it over the panel using some painters tape. I then tape the stencil onto my work surface. *A better way to attach the stencil onto cardstock when using gels or pastes is to spray the back of the stencil with Pixie Spray. This spray has a light tack to it which is meant to be used with stencils. Keeping the stencil adhered against the cardstock around all of the details will prevent the gel or paste from seeping under the stencil. I didn’t think of using the spray until after I was done, ha!
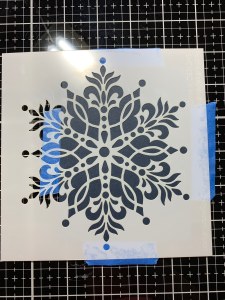
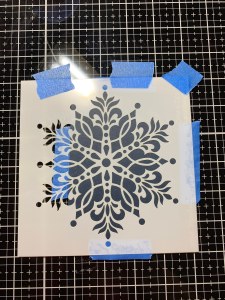
Using a Palette Knife I spread some Transfer Gel Duo onto the top of the stencil. I then take my Stencil Pal to drag the gel down the stencil, covering all open spaces and spreading it evenly.
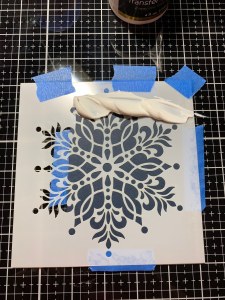
Next, I carefully remove the stencil from the panel. As the panel sat for a few seconds I noticed there were some air bubbles in the gel so I took my Retractable Craft Pick and gently popped them then sat the panel aside to dry. The gel goes on milky white and will dry clear when it is ready to foil or flock.
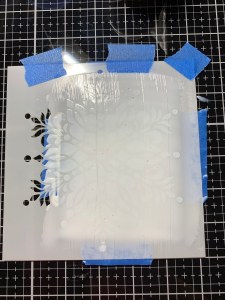
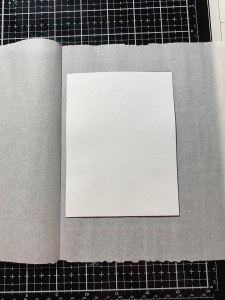
When my panel is completely dry, meaning the Transfer Gel Duo is clear it is now time to add the flock. I turn on my laminator so it has time to heat up. I then cut a piece of White Latte Flock to be the same size of my panel using my Guillotine Paper Trimmer. I place my stenciled panel into a folded piece of parchment paper design side up then place the White Latte Flock piece over the panel with the fuzzy flock side against the gel design. I then fold the parchment paper over the panels and run them through my laminator (I like to run it through my laminator twice). *If you were to use a die cut machine instead of a laminator you would place the flock piece over the stenciled panel, fuzzy side against the design and run them through the die cut machine as you normally would when die cutting.
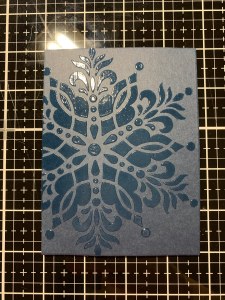

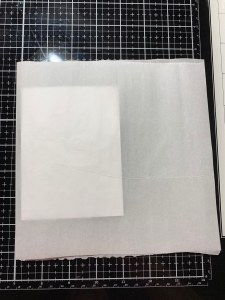
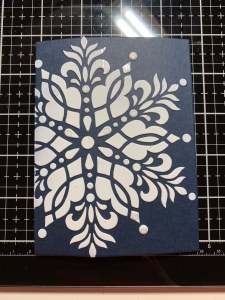
I remove the panel from the parchment paper and wave the panel in the air for just a few seconds to cool it down. I then gently peel the flock piece from the panel to reveal the beautiful image!! The look of this flocked image in real life is so beautiful, especially against the dark cardstock. I’ve added a close up photo to better capture the look.

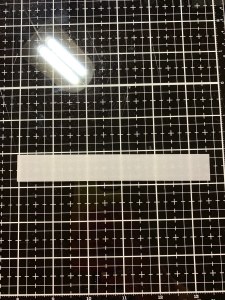
For a greeting, I cut a 3/4″ x 5 1/2″ strip out of Vellum using my Guillotine Paper Trimmer. I then place the Vellum into my MISTI Stamp Positioner and prepped it with my Anti Static Powder Bag. Next, I center a greeting from the Seasonal Greeting Stamp Set and stamp it with White Pigment Ink, add White Embossing Powder then heat set with my Heat Tool. *When using white embossing powder I like to stamp with white pigment ink for a more solid, bold embossing.
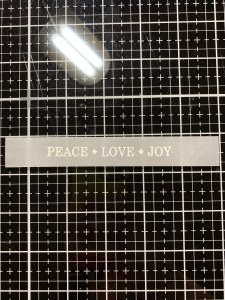
I now add some Terrific Tape to the back of each end of the Vellum strip. I then remove the release paper and line up the greeting across my panel then wrap the ends around the back and secure.
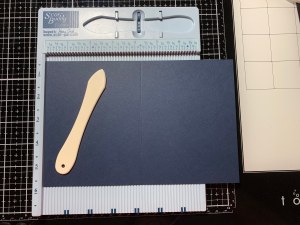
To create a mat for my panel I take the largest layering die from the Master Layouts 1 Die Set and cut out of White Cardstock, running them through my Big Shot. Next, I add Terrific Tape to the back of my stenciled panel and adhere it onto the white panel.

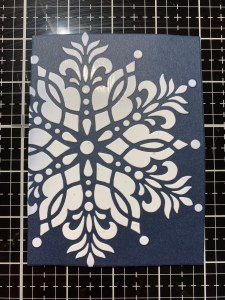
Next, I place a 5 1/2″ x 8 1/2″ piece of In The Navy Cardstock into my Scor Buddy and score it at 4 1/4″ creating a side folding card base. I add Foam Tape to the back of my panel and mount it onto the card base.

Using my Jewel Picker I add some Dazzling Diamond Rhinestones with Connect Glue to embellish the snowflake and this completes my card.
I love the simplicity of this card!! The saying “Less is more” is so true with this card and allows the flocking to stand out. Dark navy is one of my favorite holiday colors paired with white and or silver. This card would look beautiful using any dark jewel tone colored cardstock… or aqua or pink!!! Gina carries a couple other stencils – Snowflake Mandala and Mandala which would also be perfect for this look. If you like the look of sparkle or shine, ThermoWeb sells a huge line of foils that can be used with toner ink or the transfer gel I used today. They also carry a line of Gina K. Designs Glitz Glitter Gels, including neon colors that can be used with stencils to give a beautiful glittered look.!
If this is your first time visiting my blog, welcome and I hope you return. If you are a returning visitor, thank you so much for your support!
If you would like to be notified by email each time I post a new project, there is an option to add your email (located on the right side of my page) then hit the subscribe button. Should you have any questions or comments please leave them in the comments section. I’d love to hear from you and what you thought about today’s card.
Thank you for visiting and I hope you come back soon!
Happy Stamping and God Bless!!
Jeannie

Love this! I thought the stencil looked cool without the flock too. You never cease to amaze me. So talented.
LikeLike
Thank you so much for your kind words Barb!! This stencil is just plain beautiful!
LikeLike
Thank you for the tutorial as I just bought the white flock paper.
LikeLike
Thank you Vivian, have fun creating!!
LikeLike
Your cards are always so beautiful and so well described. Anxious to try this one.
LikeLike
Thank you so much Linda!! Enjoy creating, it is a fun technique!!
LikeLike